|
n00bspace
|
| Tutorial
Part 4: Learning The Interface |
Tactical
Complete
list of Tactical Commands.
Once
you select your ship, you will be brought into the Tactical
Interface of the game. It should look like this (with
the exception of #6 and #8):
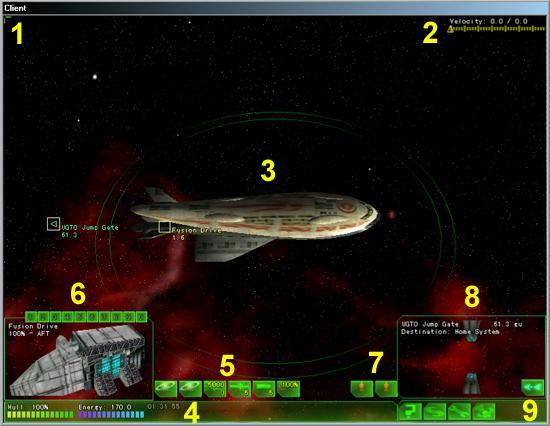
|
Tactical
Interface Map
|
| 1 |
Chat
Display |
Area
of the screen where chat is displayed. |
| 2 |
Velocity
/ Heading |
Indicates
the speed of your ship. |
| 3 |
Main
Display |
Help
/ Tactical / Engineering / Chat Log |
| 4 |
Ship
Status Bar |
Shows
hull integrity, ship energy, and current duration of
the scenario. |
| 5 |
Ship
Systems |
Displays
all the systems of your ship. |
| 6 |
Systems
Display |
Displays
selected ship system in a graphic form. |
| 7 |
Cargo
Display |
Displays
what your ship is currently carrying aboard. |
| 8 |
Target
Display |
Displays
the selected target (i.e. ships, planets...) |
| 9 |
Master
Controls |
Help
/ Navigation / Engineering / Message Log / Profile |
As mentioned before, #6 (Systems Display) and #8 (Target Display)
will not appear on you main display once you start the game.
These will be explained further.
1.
Chat Display
The
Chat Display appears in the upper left hand corner of the
screen and will show you chat taking place during the game.
The messages displayed will only appear for a short time,
and then they will fade away. To send a message, simple hit
Enter, your message, and Enter again. When
you hit enter for the first time to enter your message, a
green box that runs the length of the screen will appear only
at the top of the screen. This shows you what you are typing
in. Different types of messages are denoted in different colors.
Heres what they are:
| Color |
Description |
| Green |
Team
chat. This is the default chat, so you do not have
to type anything extra to talk to your team. |
| Orange |
This
is using the /yell command. These messages can be
seen by either team, within a certain area. |
| Yellow |
This
is using the /broadcast command. All players in the current
game can see these messages. However, only moderators
can use the /broadcast command. |
| White |
This
will display system messages, pertaining only to your
ship. It tells you when you've orbited a planet, aligned
for a jump, etc. |
| Purple |
This
display enemy chat. By using the /enemy command, you can
chat with all enemy players. |
| Target |
If
you wish to talk to a specific player in game, use the
/target command. This will send a message only to a targeted
player. Remember, you must target a player first before
using this command. |
2.
Velocity / Heading Meter

The
bar on the left is your velocity meter. It shows how
fast your ship is currently going. The little triangle on
the meter, will show you what you've set your velocity to.
The two numbers above the meter show your current speed and
your set speed. For different ships, the max speed will be
different.
The
heading meter indicates your direction and turn radius. The
first number is your actual heading, based on a grid map of
the entire system. This is indicated by the fullness of the
meter. This is not really that important. The next number
is your turn radius. This tells you how fast your ship is
turning left or right. The position of the green triangle
will indicate what you've set your turn radius too. Pressing
"S" will stop the turn, and center the triangle.
3.
Main Display
This
is where all of the action of the game takes place. Your ship
will always be centered in the screen. The green rings around
the ship indicate the damage of your shields or armor, depending
on if you control an ICC or UGTO ship. To the left of the
screen, you will notice a small green triangle pointing to
the left. These little triangles will be shown on all
four sides of the screen, depending on what your ship sensors
detect. They also come in three colors: Green:
Friendly,
Yellow: Neutral,
Red:
Hostile.
Shield
/ Armor / Turn Status
You
can view the shield / armor / turn status of
a ship in more graphical manner by hitting backslash (
/ ). When you spawn your ship for the first time in a
game, only the shield / armor status will be automatically
turned on. This will show a series of green rings around your
ship. The number of rings depends on how much armor / shielding
your ship has. When the color changes to red, with a number
of colors in between, that means that part of your shields
/ armor has been damaged, and is no longer protecting your
ship at 100%. When you have the shield / armor status
on, it will also display the shield / armor status of any
targeted ship. If you press backslash ( / ) again,
this will turn on the turn status. This will display
a green area in front of your ship when you turn, to indicate
how much you are turning. To turn everything off, press backslash
( / ) again.
Targeting
Objects
When
you see these triangles on the edge of your screen, you can
click on them to see the object. This is called "targeting".
For example, if you wanted to orbit a planet, you would "target"
that planet, and click "O" for orbit. Once you target
an object, your view will be centered on that object. If you
do not wish your view to change when you target something,
just hold down the "Shift" button while you click
on that object. This will keep your current view, but
you will still be targeting that object.
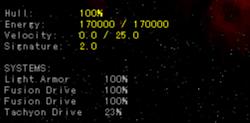
4.
Ship Status Bar

The
Ship Status Bar will show you 3 things: The hull integrity
of your ship, your ships energy, and the current duration
of the scenario.
|
Ship Status
|
| Hull |
This
shows you, in percent and graphic form, the hull integrity
of your ship. Obviously, different ships will have stronger/weaker
hulls than others. |
| Energy |
This
shows the current energy that your ship has free. Energy
is used when you fire weapons or use special ship systems,
such as ECM and ECCM. Energy is also used when your main
thrusters are in use. The higher the velocity of your
ship, the more energy will be used. When your ship reaches
0 energy, then it will no longer recharge any ship systems. |
| Signature |
You
signature reflects how easily your ship can be detected
by enemy sensors. Your signature is dependant on whether
or not you're using ship systems, repairing ship systems,
or changing your velocity. Using and repairing ship systems
will increase your signature. Traveling at faster speeds
will also increase your signature. ECM, Electric Counter
Measures, is the only system that will decrease your signature.
ECCM, Electric Counter Counter Measures, will allow your
ship to detect ships with lower signatures, but also will
increase the signature of your own ship. If your signature
value is less than 0, then you will be usually be undetected
by enemy ships. A signature of greater than 0 will make
you detectable. |
| Time |
This
is the total time the scenario has been running on a server,
displayed as hours:minutes:seconds vs. the total time
of the scenario. This only applies to time restricted
games. |
5.
Ship Systems
Here,
you will see all the systems currently supplied in your ship.
Currently, the systems for each ship are fixed, so you cannot
add or remove ship systems. Right clicking on one of the systems
will display that system in the Systems Display box.
You will see that some of the systems have letters and number
associated with them. These letters and numbers mean different
things for different systems.
|
Ship
Systems
|
| Weapons
Systems |
Weapons
systems boxes will contain either a letter or some numbers.
Numbers in the top right corner denote the amount
of shots you have left with that weapon. If there is no
number here, the weapon has no limited ammunition. Numbers
or letters in the bottom right corner
indicate "hot-keys_ for that weapon. Some weapons
will display a AD as
well. This is only for beam weapons, and indicates
that your ship has activated the point defense system,
which destroys all projectiles attacking your ship. |
| Defensive
Systems |
Defensive
systems include armor and shielding. You will notice a
percentage number at the top of these systems boxes. This
number represents what percentage of your shields or armor
and currently working. Shields and armor automaticall
repair themselves. |
| Ship
Systems |
On
the rest of the ship systems, you will notice numbers
and letteres. The letters indicate hot-keys. The numbers
are the value of whatever that system has left. For example,
the Tachyon drive is the main drive used for "jumping".
The number in that systems box indicates the amount of
fuel you have remaining to make jumps. For repair
bays, you must carry resources to repair ships. The number
in the repair systems box will indicate how many resources
you have availalbe to repair and rearm ships.. For engineering
ships, the number value associated with building a structure
is the amount of resources on a current planet needed
to build that structure. |
Hot-Keys
Hot
keys just refers to setting a certain command to a specific
keystroke, so it is easier and done more quickly. The small
letters and numbers in the bottom corners of the systems boxes
are the current key that is appointed to that system. If it
is a weapons system, you can set different weapons to different
number (1-9), so they fire when you hit that number. Setting
a weapon to 0 will clear it of a hot key. Other systems, such
as the jump drive, ECM, ECCM, and some weapons have letters,
instead of numbers. These, however, cannot be changed
To
set hot-keys, right click on a system, and click on a number
you wish to set that system to. Multiple systems can be set
the the same hotkey.
6.
Systems Display
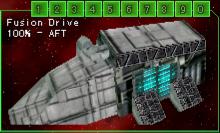
If
you right click on a systems box, the current system will
be brought up in the Systems Display. From here, you
can the systems of your ship. The systems display will tell
you what the selected system is, where it is located, and
the amount of damage it has taken (%). You will also notice
a row of numbers at the top of the systems display. This is
for setting hot-keys (see above).
For
beam weapons, you will also notice a few buttons in the bottom
right corner. These buttons allow you to choose auto defense,
auto attack, and auto off.
7.
Cargo Display
This
area of your interface will show what types of cargo you are
carrying on your ship. Currently, ships can carry only
two types of cargo: infantry
and
resources.
Each cargo spot can hold 1 infantry, or 250 resources. Depending
on what type of ship you're commanding, the number of available
cargo spots will vary. For example, transport ships have 10
cargo spots available, while scout class ships have none.
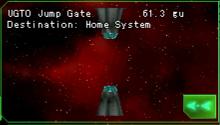
8.
Target Display
As
mentioned before, targeting objects can be done by clicking
on the triangles that appear at the edge of your interface.
This will bring up the Target
Display.
The target display will give you different information depending
on what kind of object you've targeted. All objects
in the target display box will give you the name of the object
and the distance away it is from you (in gu).
|
Target
Types
|
| Jump Gates |
Targeting
jump gates will tell you which faction controls that jump
gate and it's destination. In scenario games, the destination
will be the same system that you're currently playing
in. In Metaverse games, where servers are linked, it will
tell you what system that particular jump gate connects
to and the admin on that nexy system. |
| Planets |
When
you target a planet, the target display will show a picture
of the planet and show you the following information: faction
control, resource types, current resource amount, resource
production, and population. |
| Ships |
Targeting
ships will tell you the ships faction, name of player,
ship class, armor integrity, and shield integrity (for
ICC ships only) |
You
will again notice a few options in the bottom left hand corner.
These option include Follow,
Dock, Load, Unload.
|
Target
Options
|
Follow
|
Following
an object will cause your ship to set an intercept course
with that object. If the object is mobile, then your ship
will also move in the same direction as that object.
The
Follow hotkey is "F"
|
 |
| Dock |
This
option is only available when you've targeted another
ship. The same as the Follow
command, except your ship will also try to "dock"
with the selected ship.
The
Dock hotkey is "G"
|
 |
| Orbit |
Orbiting
can only occur with a planet. This will cause your ship
to move in the same direction and velocity as the targeted
planet you have selected to orbit. This is useful when
you want to unload or load infantry or troops onto a
planet, or if you are planning to build structures on
the surface.
The
Orbit hotkey is "O"
|
 |
| Load |
Loading
can occur in 2 situations: when you are orbiting a planet,
or when there are free resources floating around. From
a planet's orbit, if you wish to load infantry, you need
to select that infantry unit and select this command.
To load resources, target the planet from orbit, and select
the load command. Resources are also sometimes found floating
in space. To load these resources onto your ship, you
need to be within a 100gu range, then select the resource
unit and then the load command.
The
Load hotkey is "L"
|
 |
| Unload |
*Note:
This command is not directly listed in the target display.
When you orbit a planet, the planet will display a number
of empty "slots" that you can select. If you
have cargo on your ship, the unload command will unload
the first item in your cargo onto that slot on the planet.
If you're unloading infantry, that infantry will take
up that slot and you will have to select another one
to unload something else. If you are unloading resources,
then the slot is not taken up by the resources, and
can be used again to unload another item
The
Unload hotkey is "U"
|
|
9.
Master Controls
The
master controls include 6 options: Help / Tactical / Engineering
/ Chat Log / Profile
|
Master
Controls
|
| Help |
Toggling
the in-game help file will bring up a window with a list
of all the controls and their functions.
Toggle
Help by "F1"
|
| Navigation |
Toggling
the Navigation menu will change your interface into
the Navigation display. From here, you can see all the
planets in the system, where they are located, your
faction's fleet, objectives, and more. This will be
discussed in the next section.
Systems
links is now only available in Metaverse games. This
is integrated into the Navigation screen, and you will
be able to see all the systems in the Metaverse when
you scroll out.
Toggle
Nacigation by "F2"
|
| Engineering |
Toggling
the engineering menu will bring you to the engineering
display. From here, you can view all your ships systems
(primary and weaponry), and their damage percent. Also,
you will notice a queue box with a list of system your
ships is currently repairing. From here, you can change
the order of which system gets repaired first.
Toggle
Engineering by "F3"
|
| Message
Log |
Toggling
the message log will display a box in the upper left hand
corner of the main screen. From here, you will be able
to look at what has been said and done in the last few
minutes of play.
Toggle
Message Log by "F4"
|
| Profile |
Toggling
the in-game profile will display a box in the upper right
hand corner of the main screen. This will display your
current profile status as it would appear from the lobby.
In-game profiles are refreshed every 5 minutes.
Toggle
Profile by "F5"
|
Once
you toggle the Navigation
or Engineering displays,
you might think you're stuck in that view. To return to the
Tactical screen, simple press the hotkey for the screen
you are currently in (i.e. if you're in the engineering screen,
press F3 to return to the tactical screen).
Navigation
Complete
list of Navigation Commands.
The
Navigation Screen gives you an overall view of the entire
system. The Navigation Screen can be accessed by pressing
F2. Your display should change to the following screen:
|
Navigation Interface
Map
|
| 1 |
Objects
List |
A
list of all planets, stars, planets, and other non ship
items. |
| 2 |
System Information |
Displays
the system name and the number of planets controlled by
each faction, as well as the total resources. |
| 3 |
Ships
List |
Shows
all friendly ships and detected enemy ships, as well as
their current hull status. |
| 4 |
Navigation Commands |
List
of the Navigation Commands. |
| 5 |
Orders
List |
List
of available orders that can be given to other players. |
| 6 |
Ship Status
Bar |
Shows
hull integrity, ship energy, and current duration of the
scenario. |
| 7 |
Master
Controls |
Help
/ Navigation / Engineering / Message Log / Profile / System
Links |
Items
in the Navigation Screen are indicated by small icons.
Here's what each icon represents:
| Ship |
Icon |
|
Item |
Icon |
| Fighters |
 |
|
Asteroid |
 |
| Scout |
 |
|
Hazard |
 |
| Transport |
 |
|
Jump Gate |
 |
| Supply
Ship |
 |
|
Nebula |
 |
| Engineer |
 |
|
Platform |
 |
| Frigate |
 |
|
Planet |
 |
| Destroyer |
 |
|
Star |
 |
| Cruiser |
 |
|
Resources |
 |
| Dreadnaught |
 |
|
1 |
1 |
| Station |
 |
|
1 |
1 |
1.
Objects List
The
Objects List shows all the objects (excluding planets) that
are in the current system. This list varies depending
on how big the system is. Usually, this list consists only of
planets, jump gates / wormholes, and stars. However, when a
scout has successfully tagged an enemy ship or planet, these
beacons will also show up in the objects list. Clicking
on any of these items will highlight that object on your navigation
screen. These objects also have a color associated with them.
Red
objects mean they are controlled by the enemy, Green
objects are controlled by your team, and Yellow
objects are neutral.
2.
System Information
The
System Information displays 3 things: The system name, the
number of planets controlled by each faction, and the number
of resources avaiable to each faction. You will notice two
number next to each faction name. The first number indicates
how many planets that faction controls in the system, and
the second indicates the total resources available to each
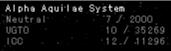
faction. So in this example, the UGTO has 10 planets,
with a total of 35,269 resources.
3.
Ships List
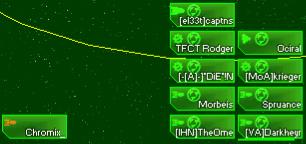
The
Ships List displays all the friendly ships on the right, and
all the enemy ships that are detectable to the left. You will
detect enemy ships depending on your scanner power and their
ships signature. On the bottom of each ship, there is a hull
status bar. If the players ship is at 100% hull, then there
will be no indication. However, as their ship starts losing
its hull integrity, the bar will start from green at the right
and go towards red to the left, until their ship is either
being repaired or is destroyed.
4.
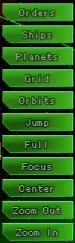
Navigation Commands
The
Navigation Commands allow you to manipulate what is shown
in the Navigation Screen. Here's an explanation of what
each command does.
|
Navigation Commands
|
| Orders |
Toggles
orders on / off. |
|
| Ships |
Toggles
ships on / off. |
| Planets |
Toggles
planets on / off. |
| Grid |
Toggles
grid on / off. The grid displays color areas, depending
on the control of planets. |
| Orbits |
Toggles
orbites on / off. |
| Jump |
Activates
jump drive, jumping to a targeted object. |
| Full |
Moves
the camera to the furthest zoom. |
| Focus |
Moves
the camera to the closest zoom. |
| Center |
Centers
the screen on a targeted object. |
| Zoom
Out |
Zooms
the camera out. |
| Zoom
In |
Zooms
the camera in. |
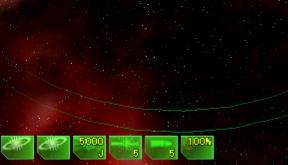
Orders
can be given by any player, and can be given to any other
friendly player. There are currently 5 orders available:
Orders can be useful when you are planning a strategic attack.
When you send an order, the Navigation Display will show
a line connecting the player with an order to the objective
they recieved. For example, if you order a player to capture
a planet, then a line will connect that player to the planet
you want to be captured.
Engineering
The
Engineering Screen will give information pertaining to your
ships systems, as well as the repair status of any damaged
systems. This is what the Engineering Screen should look
like:
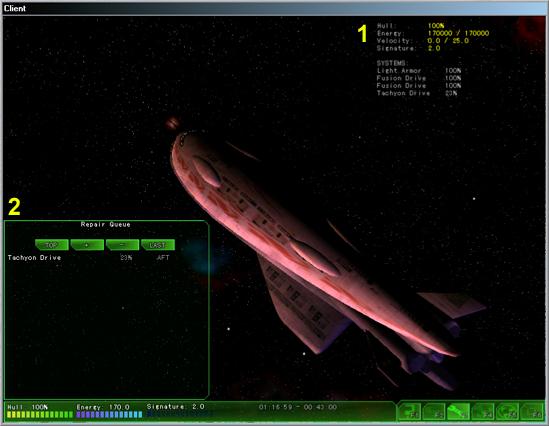
|
Engineering
Interface Map
|
| 1 |
Systems
Information |
Displays
you current ship status, as well as the status of
your ships primary systems. |
| 2 |
Repair
Queue |
Displays
any damaged systems, it's repair status (%), and location
on the ship. |
The
Systems Information is displayed in the top right hand
corner of the Engineering Screen. This will tell
you your ships hull %, its available energy vs. total
energy, its velocity vs. max velocity, and its signature.
It will also show you all your primary ship systems,
and at what percent damage they are at. 100% means that
system has taken no damage.
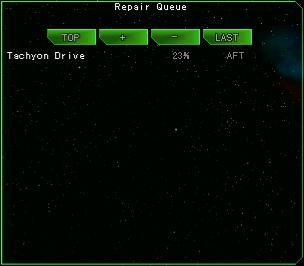
The
repair queue gives you a list of all the damaged systems
on your ship. It is listed by the system name, its
integrity %, and its location on the ship. Your ship
will automatically repair the first system that is
damaged. However, if you are in a dangerous situation,
and you need your jump drive repaired right away,
you can change the order in which your ship systems
are repaired. To do this, select the system
you want to move around, and use the four buttons
available in the repair queue. Here's what they do:
|
Repair
Options
|
| Top |
Moves
the selected system to the top of the repair queue. |
| + |
Moves
the selected system up 1 position in the repair
queue |
| - |
Moves
the selected system down 1 position in the repair
queue. |
| Last |
Moves
the selected system to the bottom of the repair
queue. |
Tutorial
Part 3: Helm Controls < Tutorial Part
4: Learning The Interface>
Tutorial
Part 5: Planets
|
|